Managing your digital workspace in Windows 10
 Computers play a big part in all our daily working lives. Part of the commitment the business makes to you as a user, is to provide a suitable workspace (good sized desk, adjustable chair, decent quality monitor and keyboard etc.) for you to do your job. This is why we have regular Display Screen Equipment (DSE) Assessments.
But the one thing that you have sole control over is your digital workspace and screen real-estate and we have seen some horror shows over the years! We believe it is as important to your health and well-being at work to keep your Windows Desktop under control as it is to have a chair with lumber support.
So here are a few hints and tips to help keep your Windows Desktop clutter-free.
NB: You should be aware that this blog focuses around the Windows 10 Operating System - but many of the principles are the same for older versions of Windows.
Starting your declutter
Often, the thing that is stopping us from having a clear Desktop is the multitude of items we have accumulated there, and the fear that we will lose something 'important' if we try to tidy it up. Well, it's time to get brave... but certainly not foolhardy. The best approach we have found for a Desktop purge is to create a single folder and name it 'Old Desktop'. Then, select every item on your Desktop (apart from the Recycle Bin) and drag it into your newly created folder for safe keeping.
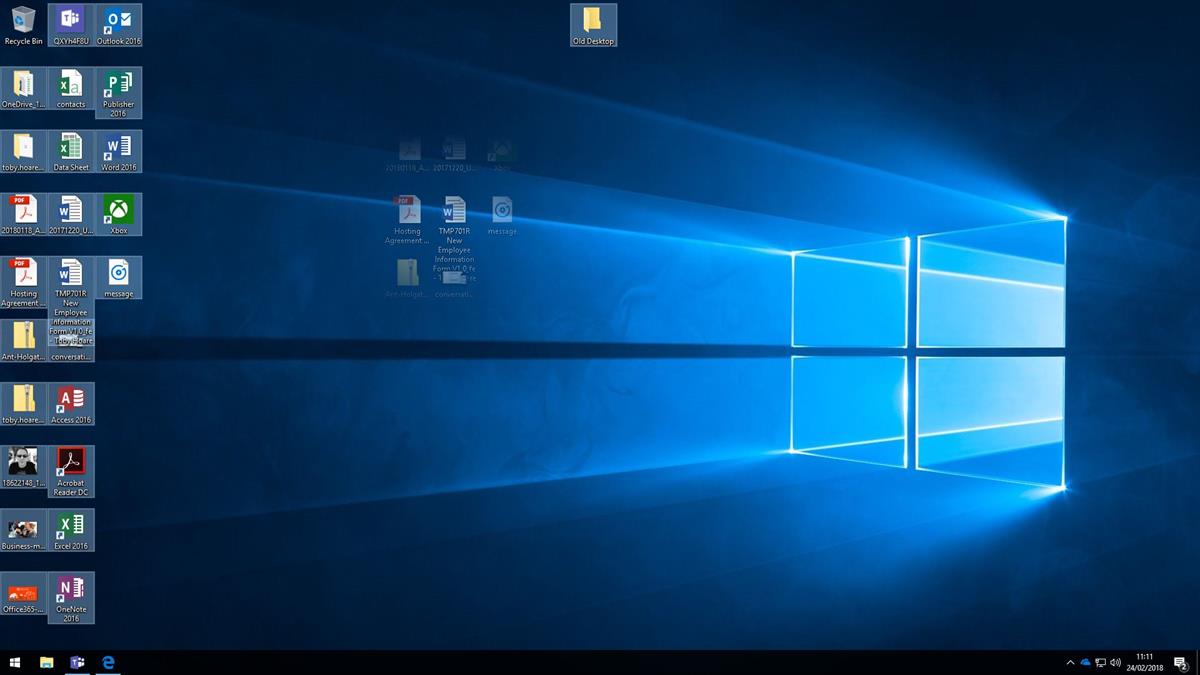
There is actually nothing 'special' about your Desktop. It is a folder just like any other in Windows. It just happens to be displayed when you switch on your PC. So you can always recover what you have done by finding the item you want in your 'Old Desktop' folder.
Use the Start Menu
The Start Menu can be a little confusing when you first install a copy of Windows 10. This is because Microsoft (in their wisdom) have decided that this is a good place to advertise Office 365 or to force feed you Candy Crush Saga - but it doesn't have to be this way. You can place pretty much anything you want to access in your Start Menu and organise it into logical categories so that items are easy to find.
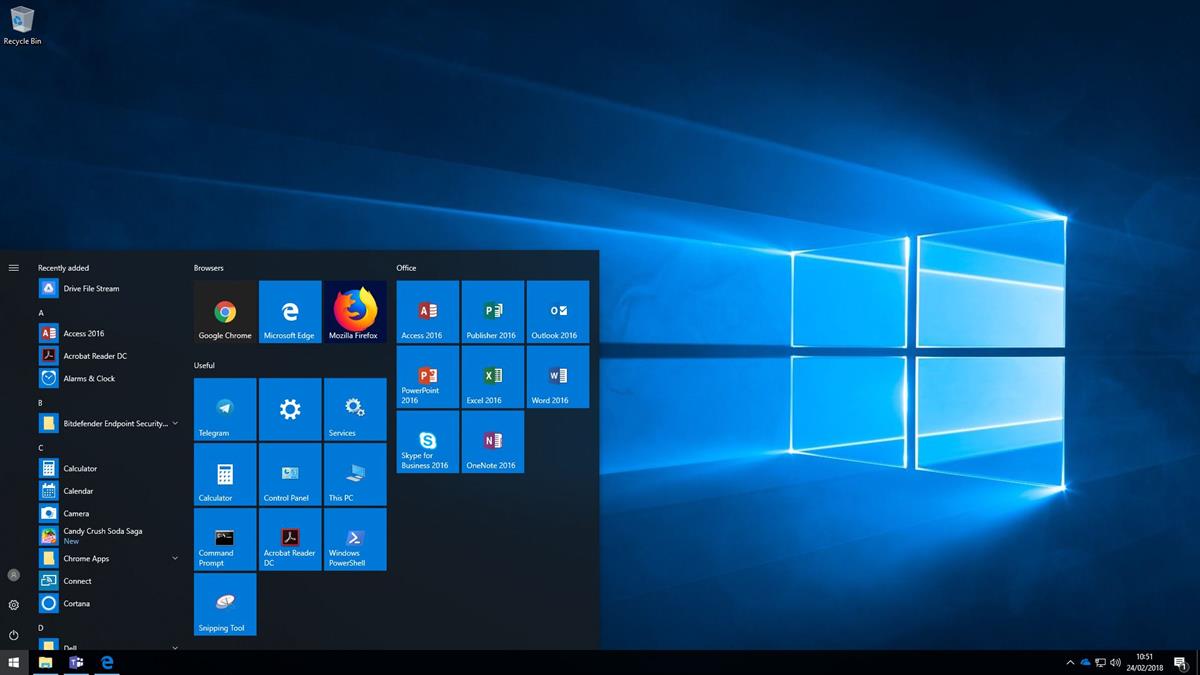
Begin by removing everything from your Start Menu to give you a blank canvas. To do this, simply right-click on each Start Menu 'tile' and choose the 'Unpin from Start' option.
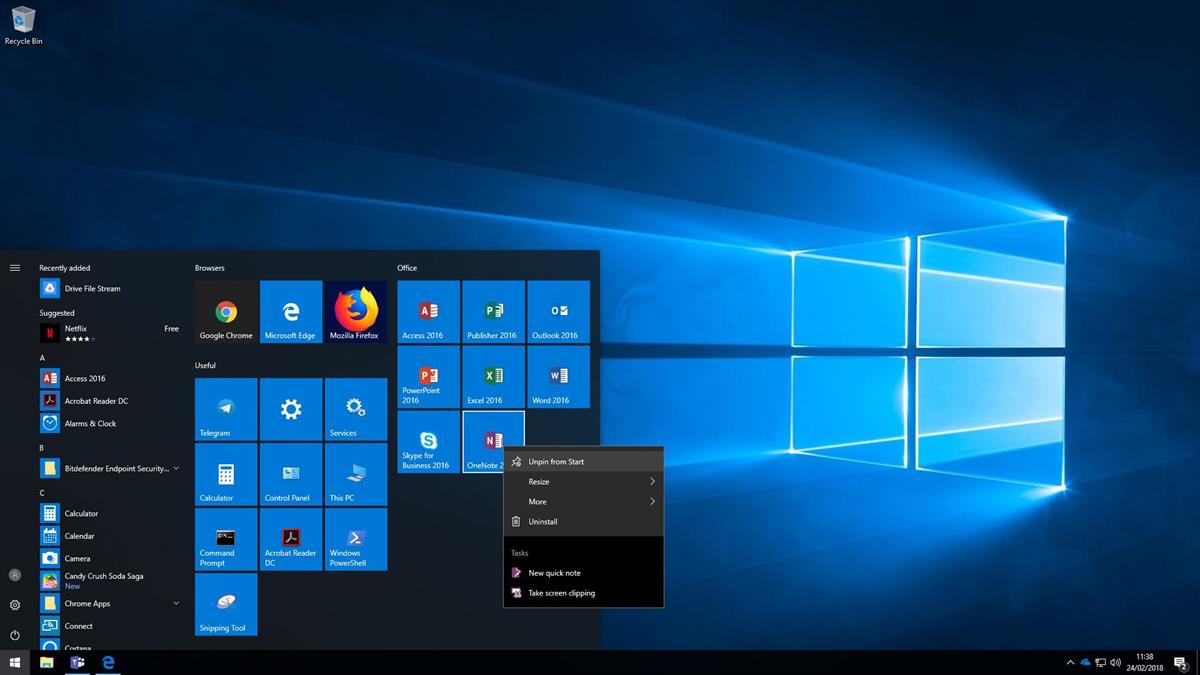
Once you have a completely empty Start Menu, you are ready to start adding the applications and locations that you need to access on a regular basis.
Start by scrolling down the list on the left-hand side of the Start Menu, right-click on the application you want to add and select 'Pin to Start'. A 'tile' will then appear in the main Start Menu area.
You can group your Applications by type if you want to, and even add or change the title at the top of each group to make applications even easier to find.
Top Tip: If you need more space to fit all of your applications into the Start Menu then it can be expanded both upwards and outwards. Hover your mouse cursor over the edges of the Start Menu and you will get the 'resize' cursor which can be used to drag the Start Menu to be any size you want.
You can also pin files, folders and network locations to the Start Menu. But we tend to use the file explorer for this, as it makes more sense for our workflow.
Use the Taskbar
The Windows Taskbar is the section that runs along the bottom of the screen (as long as you haven't moved it) that allows quick access to the applications that you have open. But you can also pin items to this as well. Many people like to have regularly accessed applications (such as Outlook, Excel, Word, Adobe Reader etc.) pinned to their Taskbar.

To add an application to your Taskbar, open the application, right-click the icon in the Taskbar and choose 'Pin to Taskbar'.
Top Tip: You can also right-click on an application icon in either the Start Menu or Taskbar to access 'Tasks'. These are common actions associated with the application. For example, right-clicking on the Outlook icon gives you the following options;
- New Email Message
- New Appointment
- New Meeting
- New Contact
- New Task
File Explorer Quick Access
A lot of cluttered Desktops usually contain folders and network locations (drives) which are used on a regular basis. We can understand this approach, as navigating through a complex file structure can really slow you down. But a better alternative may be to use the 'Quick Access' option baked in to File Explorer. This allow you to pin network locations and folders in a similar way to pinning applications to the Start Menu or Taskbar.
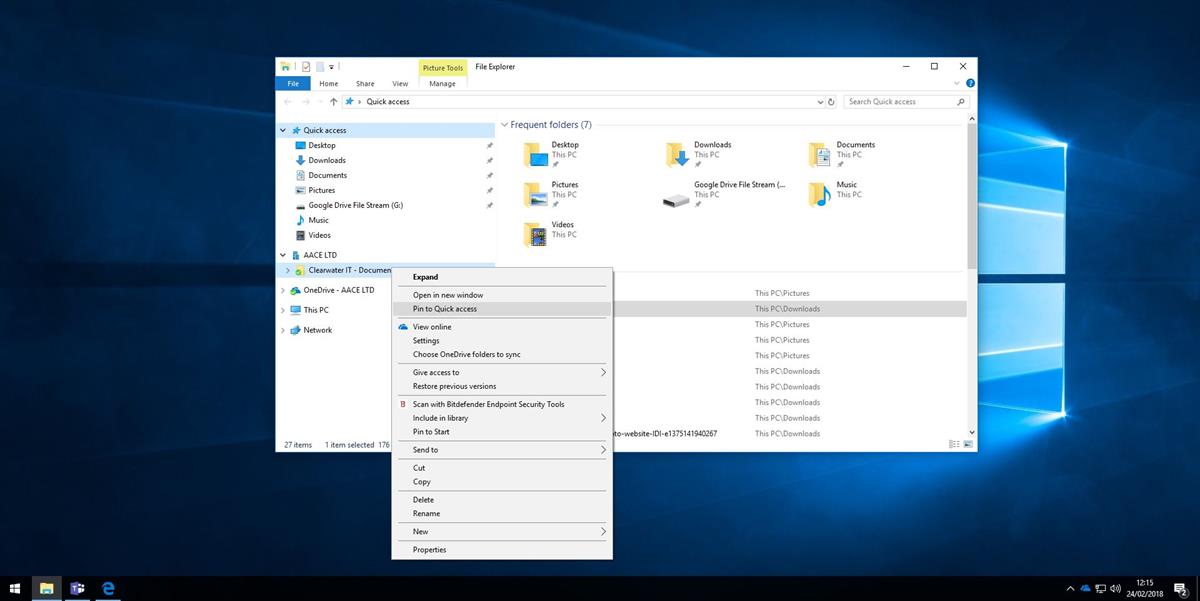
To add a folder or network location to Quick Access, just right-click on it in File Explorer and select 'Pin to Quick access'. This will make it appear under the Quick Access list, meaning you won't have to go searching for it every time you need access. To unpin an item from Quick Access, right-click the item and choose to 'Unpin from Quick access'.
Top Tip: Windows also learns which folders you access the most. These can be found in the 'Frequent folders' list. It also keeps a running list of the recent files you have accessed in the panel below. If you have a master spreadsheet that you access on a daily basis it will always appear in this list, meaning it doesn't have to sit on your Desktop.
System Tray
The System Tray sits in the bottom right-hand corner of your screen as part of the Taskbar. It has the date and time, indicates network connections, volume mixer and notifications. It also gives fast access to applications such as Anti-virus, file sync and share applications, Skype for Business and other items that run 'in the background' of Windows. To access these, click on the upwards arrow and select the icon of the application you wish to view.

Desktop Shortcuts
As we mentioned earlier, your Windows Desktop is just another folder and, as such, can contain files and folders. But it's not always the smartest approach to use it this way. It can prevent you from keeping things tidy, through fear of losing important documents, and a hard drive failure will mean that you will lose those files and folders forever.
The best way of having items readily accessible from your Desktop, is to use shortcuts to those items in other locations.
For example, if you have a Spreadsheet that you use daily and you want it on your Desktop, find it in its original location (hopefully on the server where it is backed up should the worst happen), right-click on the document and choose 'Send to' > 'Desktop (create shortcut)'.
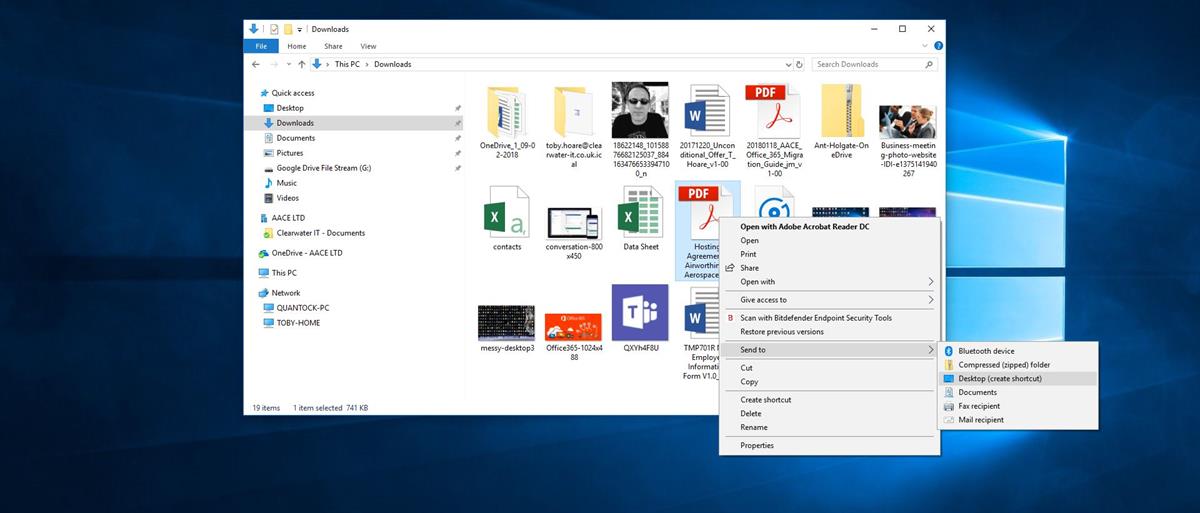
This will create a Desktop shortcut, as shown with the PDF document below.

Emails and Outlook
The final type of item that we see all-too-often sat on Desktops are emails and there really is no need to have them there when Outlook has features that allow you to mark important or categorised emails for faster access.

The plethora of options for managing emails in Outlook is probably a blog post all of its own, but it is worth getting accustomed to flags and categories as a way of locating emails that require future actions or that relate to a particular topic.
'Flagging' an email will add that email to your Outlook Tasks and quickly show which emails need a follow-up.
Top Tip: Using flags is only really effective if you then mark the email as 'completed' when the action has been taken. Otherwise your list of tasks can become overwhelming! To mark an email as 'completed', just click on the flag so that it becomes a green tick.
'Categorising' emails uses colours and text as a quick visual reference that an email is associated with others under the same category. You can have up to 25 categories and each one can be renamed to whatever you want.
Top Tip: If you access shared mailboxes with other users, perhaps agree how you will categorise these so that you can quickly identify who is expected to deal with that email.
To make life even easier, you can also filter emails by a category, by importance and by flags.
If none of this works for you then you can always use the folder structure within Outlook to effectively manage your emails into groups, subjects, customers etc. so there really is no need to keep copies of emails on your Desktop.
Conclusion
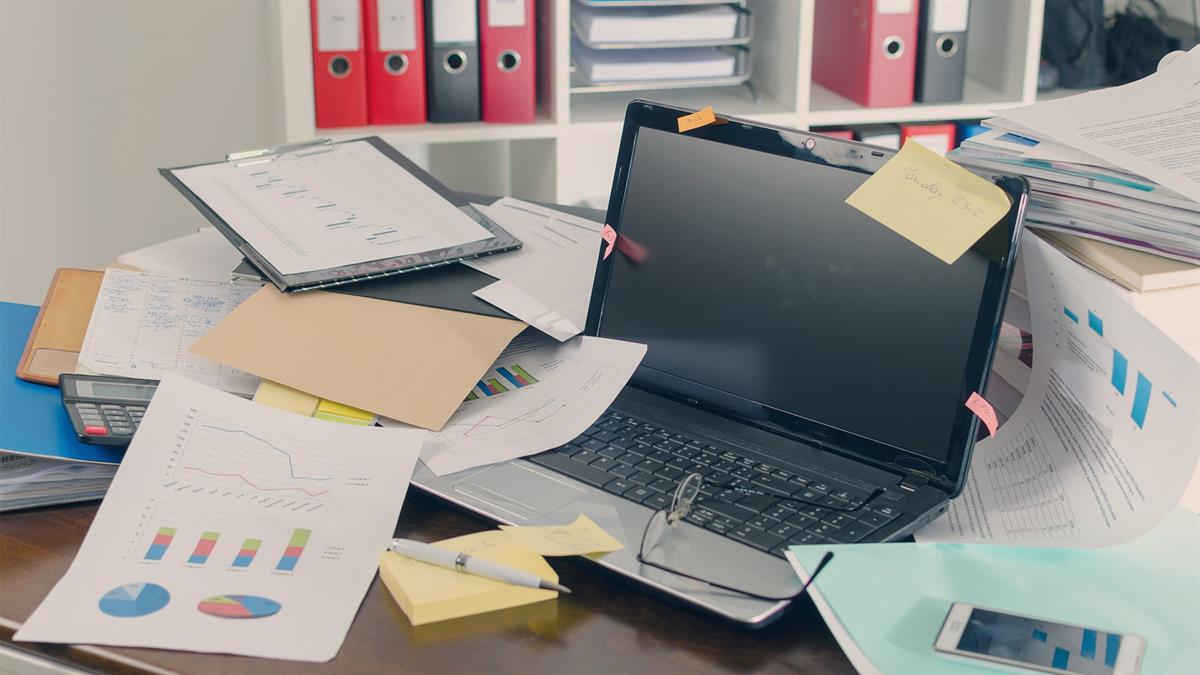
In the same way that you wouldn't try to work at a desk that looked like this, you should really try to approach your digital workspace in the same way. Leave your Windows Desktop clutter-free, learn how to use the menus, shortcuts and quick access options in Windows to keep your applications, files and folders close-by and transform the way you use your computer on a daily basis.
We will also let you into a little secret, a clear Desktop will keep your IT Department happy too. If your machine needs to be rebuilt (have Windows re-installed) then a clear Desktop makes this job just that little bit easier!
If you enjoyed this article and would like to read more – why not sign up to our mailing list? You'll receive all our best advice, straight to your inbox.